inventory management
Your guide to getting started with Craftybase
We show you how to get started with Craftybase Inventory Management software

Last updated: April 2026
Craftybase is an inventory solution built specifically for small makers. This guide will help you get started, step by step. You’ll learn how to:
- Import products and materials
- Manage expenses and inventory
- Track manufactures and fulfil orders
- Develop effective habits
- And more!
Need to get your raw material and product inventory under control?
Try Craftybase - the inventory and manufacturing solution for DTC sellers. Track raw materials and product stock levels (in real time!), COGS, shop floor assignment and much more.
It's your new production central.
Quick need-to-knows
Why should I track inventory in the first place?
Your craft products can be the cutest, most elegant, or most luxurious items on the marketplace. But none of that matters if you can’t keep your raw materials stocked, or you keep running out of products to sell. If you can’t keep a proper inventory on hand to fulfil orders, you won’t be able to grow your business effectively.
When you track inventory, you’ll respond more quickly to sales orders, prevent stocks from expiring (if that’s a concern), and cut the risk of stock outs happening at the worst possible times. And if you’re looking for the bigger picture on why this matters, inventory management for makers covers it in depth.
How Craftybase will help you as a maker
As a maker, it’s easy to get caught up in the day-to-day of running a business single-handedly. You’ve got to market the business, fill orders, and communicate with customers. Managing inventory and costs is important, but it can easily get buried under everything else.
Think of Craftybase as your warehouse foreman and finance manager all rolled into one. It makes it easy to:
- Track your material costs and stock levels in real-time
- Control cash flow by tracking revenue and costs
- Price your products intelligently and sustainably
- Manage on-hand stock of products and materials
- Sync orders automatically from Etsy, Shopify, Amazon, and more
For a full overview of what’s available, check out the complete list of Craftybase features — including recipe costing, COGS reporting, production scheduling, lot tracking, and more.
Craftybase is purpose-built for small manufacturers precisely because it’s built around the way makers actually work (with materials, recipes, and batch production) not around the way accountants do.
Important definitions
Here are a few core concepts you’ll need to know as you use Craftybase:
- Materials - items used to create your products
- Products - items you manufacture and sell
- Variations - small differences in your products like size and colour
- Recipes - lists of materials used to create products
- Manufactures - batches of the products you make
- Expenses - records of purchases like materials or fees
- Orders - customer requests to buy your product
Now that those concepts are out of the way, let’s get to the practical side: Craftybase’s capabilities.
Getting your existing data into Craftybase
A common question from new makers: “Do I need to enter everything from scratch?” The short answer is no, but you do need to start somewhere.
If you’ve been tracking products and materials in a spreadsheet, you can use Craftybase’s bulk CSV import to migrate that data in one go. Head to help.craftybase.com and search for “bulk import”, there are ready-made templates for both products and materials.
If you don’t have a spreadsheet handy, don’t let that stop you. Many makers start by entering their most important items first (bestselling products and the materials that go into them) and add the rest over their first few weeks. Starting with approximate numbers is far better than not starting at all. Craftybase gets more accurate the more data you add.
Step 1: Track your products
Entering your products
Craftybase lets you add products manually, import them in bulk, or connect directly to a sales channel.
Manually: To add products to Craftybase manually, we recommend using our printable template to create a list of all the products you have on hand. Include the quantity and unit cost of each item, then enter that data into Craftybase.
Bulk import: If you have a lot of products, Craftybase gives you the option to import them all at once. Visit help.craftybase.com to find our bulk import spreadsheet template, download it, fill in your inventory data, and import the file into Craftybase.
Direct integration: If you’re already selling on Etsy, Shopify, Amazon, or another sales channel, you can connect it to Craftybase directly from your Shops page. See which sales channels Craftybase connects with for a complete list. Once connected, Craftybase automatically pulls in your new orders, links each sale to the correct product, and updates your inventory levels every time a sale is made. No manual data entry needed.
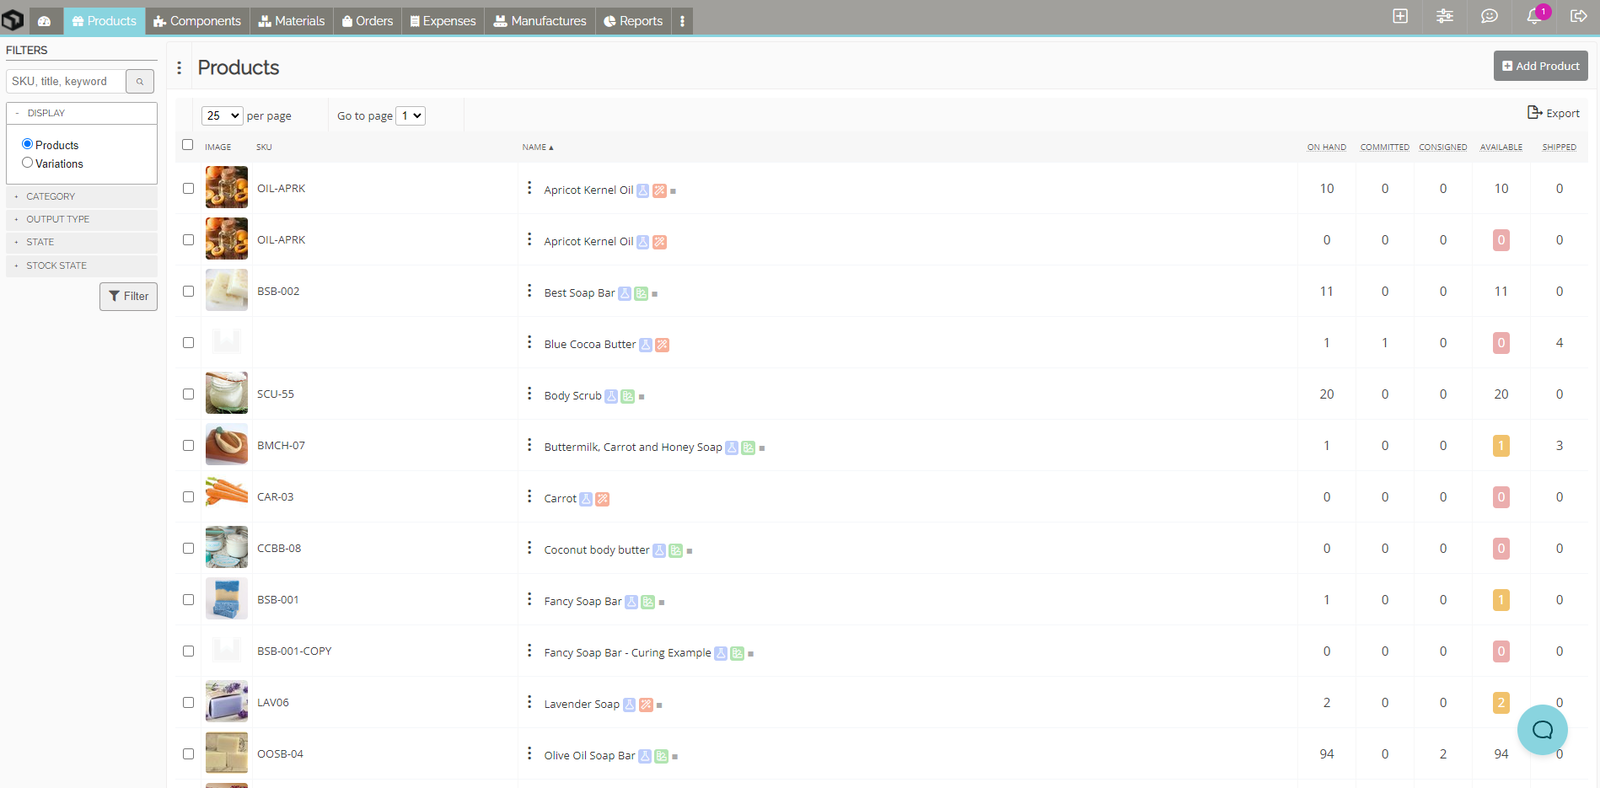
Tracking product inventory levels
You can track your product stock levels in Craftybase by going to the Products page and viewing the high-level counts.

There are different columns for different types of stock:
- On hand: Stock actually on your shelf, including unshipped orders.
- Committed: Total quantity of unshipped orders.
- Available: On-hand stock that is not committed, what’s actually available for sale. Negative numbers mean you’ve sold more than you have in stock.
- Shipped: Total quantity of shipped orders.
Monitoring inventory levels with limits
In Craftybase, you can define “Low Stock Limits” to flag when you need to make or purchase more inventory.
Go to the Product page for an item and set the low stock limit. When your product level falls below that number, it will be marked as “Low Stock” on the Products page.
Step 2: Track your Materials
Entering your materials
Craftybase lets you add materials manually or import them in bulk. Remember, materials are the items you use to create your products.
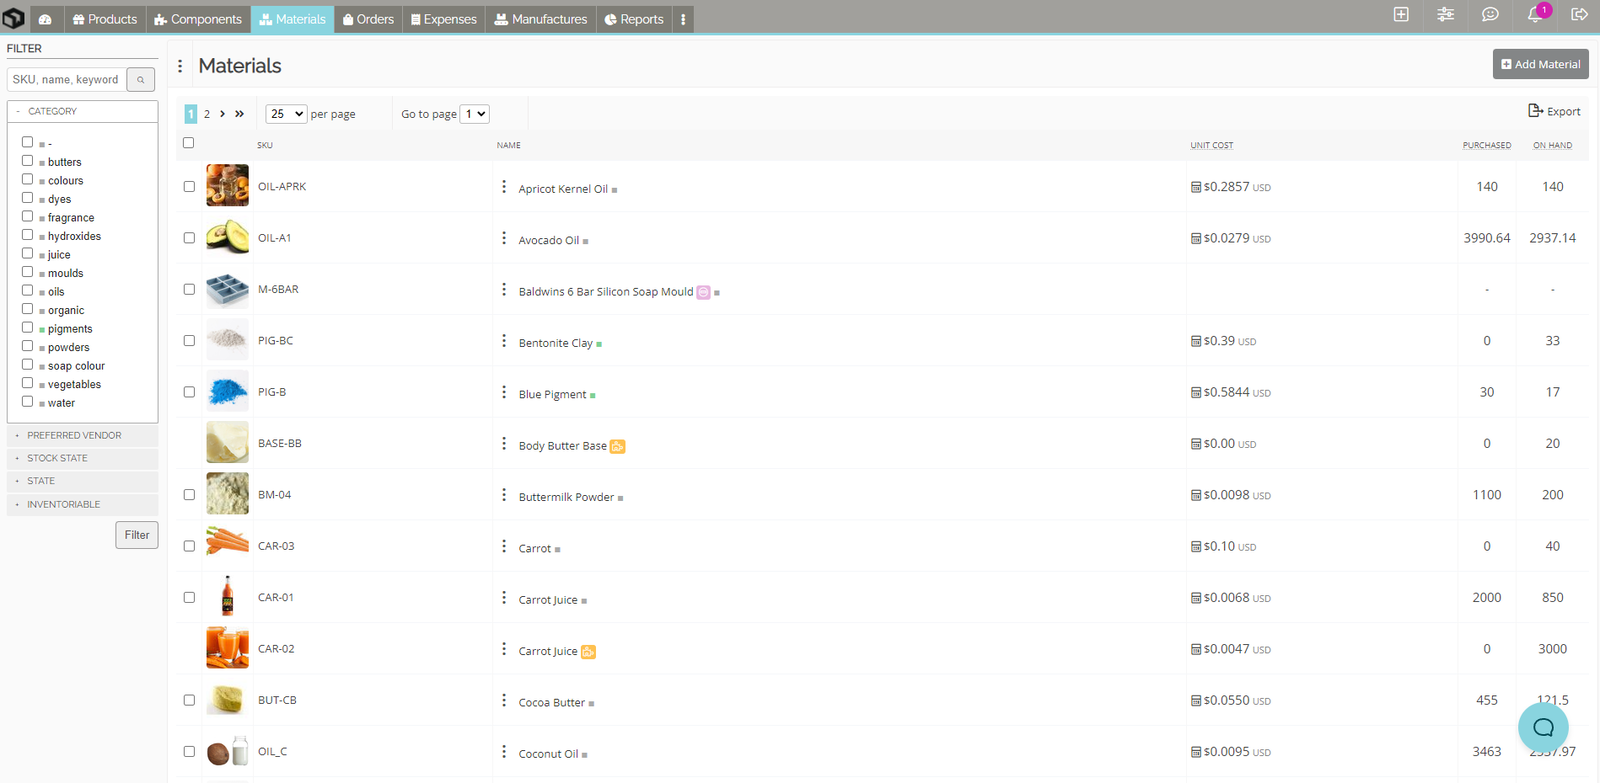
Manually: To add materials manually, use our printable template to list your current materials and stock quantities. Include the unit cost for each, then enter that into Craftybase.
Bulk import: If you work with a lot of materials, you can import them all at once. Head to help.craftybase.com to find the materials bulk import spreadsheet template. Fill in your data, then import the file into Craftybase.
Craftybase recognises two kinds of materials:
- Inventoriable — directly used to create your product. These have inventory stock levels and are included in COGS calculations.
- Non-inventoriable — items not used directly in manufacturing (e.g. packaging) or things that can’t be accurately measured (e.g. thread).
Monitoring materials with limits
Materials can be assigned a Low Stock Limit, just like products.
Go to the Materials page and select the relevant entry. Set a stock limit quantity and when the Available quantity drops below that number, the material will be flagged as “Low Stock.”
How costs are calculated
In Craftybase, material costs are calculated in real-time using your complete purchase history. Calculations pull costs directly from the unit prices you entered in material expenses. (Shipping, discounts, and taxes are not included.)
Whenever you record a new Expense for a Material, all available stock is recalculated to include the new amounts.
Step 3: View expenses
Craftybase can track both your material purchases and any other business expenses, giving you a complete picture of your costs.
Material expenses: Raw materials you use to produce your products.
Other expenses: Things like postage, transaction fees, and advertising fees.
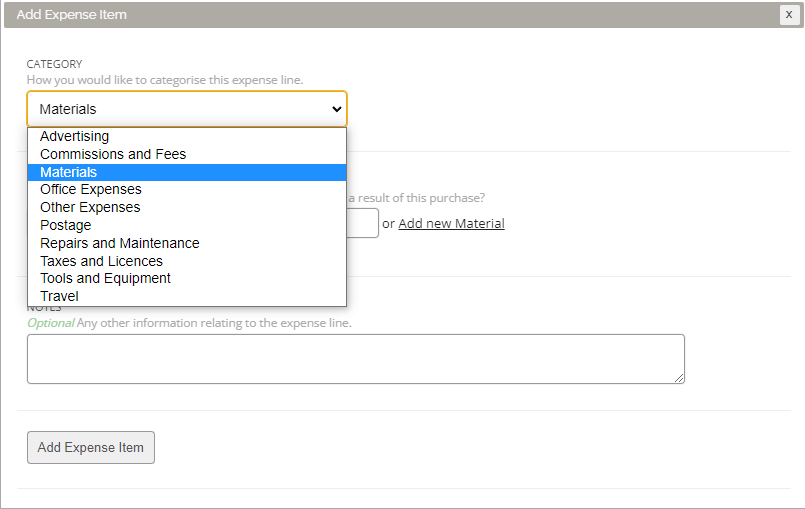
Each Expense is made up of Expense Items, similar to line items in a purchase order.
Expense categories
Every expense can be assigned its own category for easy tracking and reporting. Craftybase comes pre-loaded with its own collection of categories, but you can always add your own.
Step 4: Manufactures
Manufactures in Craftybase help you manage work-in-progress inventory and track how much raw material you use up during the production process.

Every product list page lets you Add Manufacture and open a Manufacture form.
In the form, you enter the details of the products you’ve made, quantity produced, materials used, any variations from the original recipe. Once you submit the form, two things happen automatically:
- Craftybase calculates the total material cost to produce the batch
- Craftybase updates your Product and Material inventories to reflect the new production run
You can also set up Auto Manufactures to run automatically based on incoming orders, very useful when you’re handling multiple similar orders or need to respond to a new order quickly.
One thing to keep in mind: if a material stock level is at zero when you create a Manufacture, it will show a zero cost for that short stock. Keep your material stock levels up to date to avoid this.
Step 5: Fulfilling orders
Congratulations, you just got an order! Now it’s time to record it.
Craftybase gives you the option of adding orders manually (if you sell offline) or having them created automatically when you link an online sales channel.
Manually creating an Order is straightforward. Go to the Craftybase Order menu and enter:
- Customer name
- Order code
- Delivery address
- Products ordered
Quick and easy. And if you’ve connected Etsy, Shopify, Amazon, or another platform, your orders come in automatically, no manual entry required.
Step 6: Create new processes and habits
Craftybase doesn’t just help you manage accounting. It also helps you think about how you operate your business.
The features below, used consistently, will help you run a more efficient and effective business.
Cycle counting
“Cycle counting” is a stock tracking method where you regularly count a small sample of your stock and compare it to your records. If there’s a discrepancy, you adjust your records or investigate further. Cycle counts are done either daily (for high-volume businesses) or monthly (for smaller operations).
The goal is to spread your inventory checks across a longer period so you’re not spending hours counting everything at once. A big time saver for solo makers.
Read more: What is a Cycle Count?
Recipes
Recipes are lists of materials used to create a batch of your product. When you create a Recipe in Craftybase, it can confirm whether you have enough materials to make a batch and show you exactly what it costs to produce it.
That cost figure is what lets you set a price that guarantees a profit. If you want to go deeper on this, our guide to recipe costing software explains how it all works.
Product bundles
Product bundles are collections of individual products that a customer buys together. Craftybase lets you build bundles from your existing products.
When you create a bundle, Craftybase can automatically trigger the creation of the component products, keeping all your inventory counts in line without extra bookkeeping.
Pricing guidance
Unsure whether you’re pricing your products correctly? Craftybase can help with that.
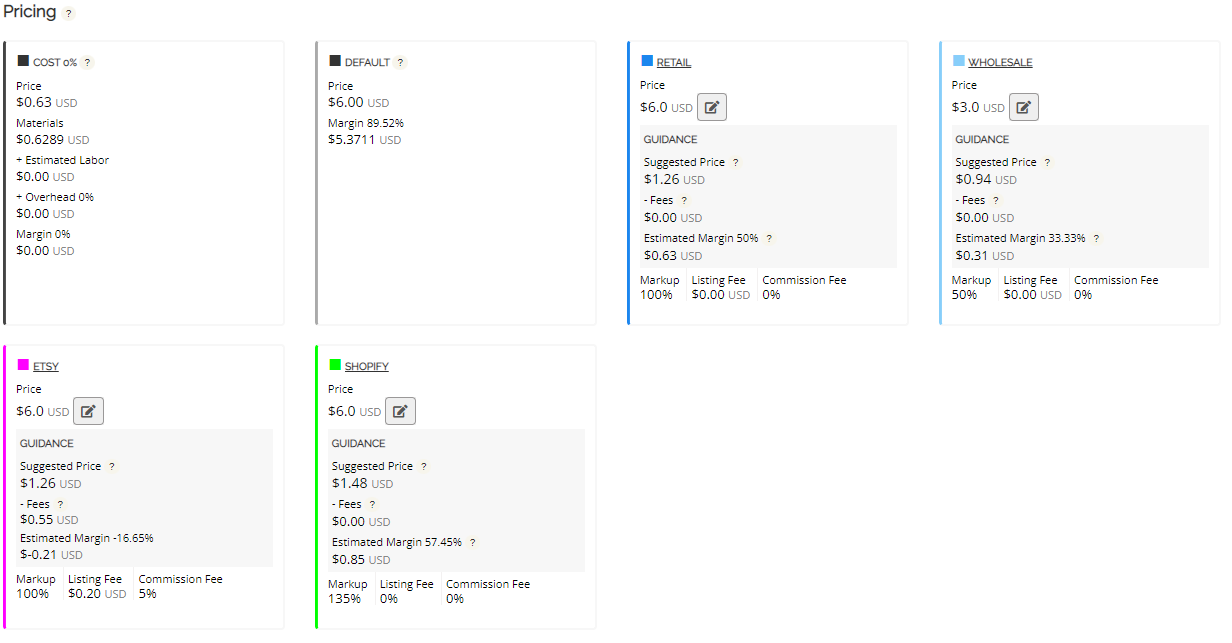
Craftybase’s Pricing Guidance feature calculates possible prices based on your product’s labour and material costs. Set a preferred percentage markup and see the total margin you’ll receive. You can also add overhead amounts like listing fees and commission fees.
QuickBooks integration
Craftybase connects with QuickBooks Online, so your financial data stays consistent across both tools. You can push expense and revenue data from Craftybase into QuickBooks without manual re-entry, which makes tax time considerably less painful.
Your first 30 days with Craftybase
Getting started is the hardest part. Here’s a simple checklist to take you from a blank account to a properly set-up business in your first month.
Week 1, set up your foundation
- Add your core products (manually or via CSV import)
- Enter your materials with their unit costs
- Connect your sales channel (Etsy, Shopify, Amazon) from the Shops page
- Record a starting stock count for products and materials
Week 2, build your recipes
- Create recipes for your five most popular products
- Check the material costs Craftybase calculates, do they match your expectations?
- Set low stock limits on the materials you run out of most often
Weeks 3-4, get into good habits
- Record a Manufacture each time you make a batch
- Log every material purchase as an Expense as it happens (don’t let them pile up)
- Run your first COGS report to see where your money is actually going
- Do a quick cycle count at the end of the month to catch any discrepancies
By the end of week four, you’ll have a live picture of your stock, your costs, and your margins, and you’ll have built the habits that keep it accurate.
Frequently Asked Questions
How long does it take to set up Craftybase from scratch?
Most makers get their core data into Craftybase within a few hours. The initial setup (adding your products, materials, and a few recipes) is the heaviest lift. After that, day-to-day use is light. If you have a large catalogue, the bulk import option speeds things up considerably. Our help documentation at help.craftybase.com covers every step if you get stuck.
What's the difference between a Material and a Product in Craftybase?
Materials are the raw inputs you buy to make things, wax, resin, beads, fabric. Products are the finished items you sell. The distinction matters because Craftybase tracks them differently: materials have purchase costs and stock levels that feed into your recipe costs, while products have inventory counts and pricing data tied to your sales channels.
Does Craftybase connect to Etsy and Shopify?
Yes. Craftybase integrates directly with Etsy, Shopify, Amazon, and several other sales channels. Once connected, new orders sync automatically, Craftybase links each sale to the correct product and updates your stock levels without any manual entry. This is one of the biggest time-savers for makers who sell across multiple platforms.
How does Craftybase calculate my cost of goods sold (COGS)?
Craftybase calculates COGS using your material expenses, recipe costs, and production records. Every time you record a Manufacture, Craftybase applies the unit cost of each material used (based on your actual purchase history) to work out the true cost of that batch. Those figures roll up into the COGS reports you need for tax time. You can read more in our guide on how to calculate COGS.
Do I need to do a stocktake before I start using Craftybase?
It helps to have a rough count of your current stock before you begin, but it's not a hard requirement. Many makers start by entering what they know and refine the numbers over the first few weeks. The printable stock count templates linked in the steps above make this easier. Starting with approximate numbers is far better than not starting at all, Craftybase becomes more accurate the more data you add to it.
Ready to get started?
You may be a solo entrepreneur, but that doesn’t mean you’ve got to do it all alone. Craftybase is your warehouse foreman and finance manager rolled into one. With it, you can tackle all your inventory, expense tracking, and cost management in a way that’s faster and more reliable than spreadsheets, or (shudder) pen and paper.
Ready to take control of your inventory? Try Craftybase free and see how it fits your workflow.