inventory management
How to Find Your Shopify Store URL (myshopify.com Address)
How to find your Shopify store URL, change your store address, set up a custom domain, and connect Shopify to inventory software — step-by-step.

Opening a Shopify store is a great move for a maker, but it comes with a learning curve that nobody really warns you about. Finding your Shopify store URL (also called your storefront address or store link) is usually the very first thing you’ll need to figure out. And then, once you’ve got customers placing orders, you’ll want those orders flowing into your inventory system automatically instead of having to enter them by hand.
In this guide, we’ll cover how to find (and change) your Shopify store address, how to set up a custom domain name, and how to connect Shopify to Craftybase’s inventory management so your inventory updates itself every time you make a sale.
Need to get your raw material and product inventory under control?
Try Craftybase - the inventory and manufacturing solution for DTC sellers. Track raw materials and product stock levels (in real time!), COGS, shop floor assignment and much more.
It's your new production central.
Last updated: April 2026
What is my Shopify URL?
Your Shopify store URL is your-store-name.myshopify.com, the unique address assigned when you create your account that never changes, even if you add a custom domain.
Your Shopify storefront URL is the name of your store, followed by .myshopify.com. This is the default address Shopify gives you when you first create your store. It never goes away, even if you add a custom domain later.
So if you named your store Big Picture Candles, your Shopify URL would look something like: big-picture-candles.myshopify.com.
There are two quick ways to find it in the current Shopify admin:
- Check your browser’s address bar. Whenever you’re logged in to your Shopify dashboard, the URL will be in the format
your-store-name.myshopify.com/admin - Go to Settings → General. Under the Store details section, your myshopify.com URL is listed alongside your store name
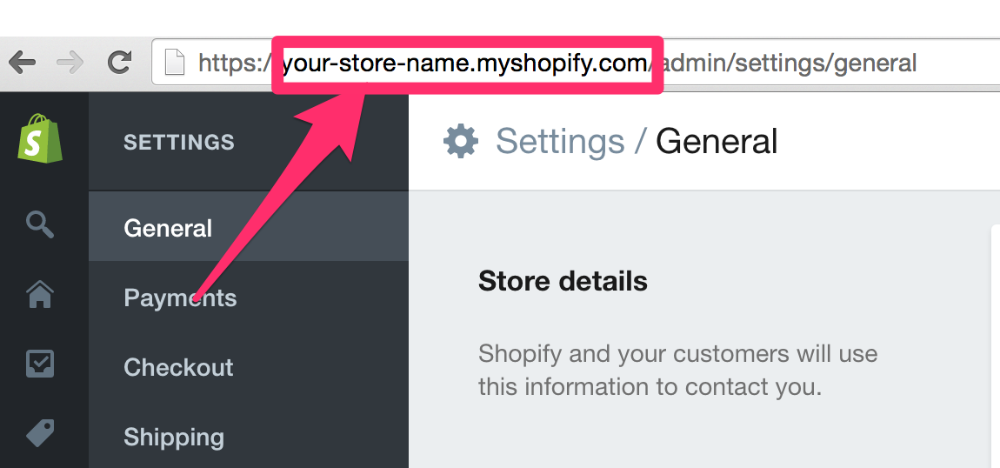
This .myshopify.com URL is important because it’s how third-party apps (including inventory tools like Craftybase) identify and connect to your specific store. Keep a note of it somewhere handy.
Does Shopify 2.0 change my storefront URL?
No. Shopify Online Store 2.0 (which introduced app blocks, JSON templates, and “sections everywhere”) is purely about theme architecture. It doesn’t change your storefront URL format at all. Your .myshopify.com address stays the same regardless of whether you’re running a Shopify 1.0 or 2.0 theme. The URL format your-store-name.myshopify.com has remained consistent through all Shopify admin redesigns and theme generations.
How do I change my Shopify storefront address?
If you want to change the display name of your Shopify store, you can do it through your settings. Note that changing the store name is different from changing your .myshopify.com subdomain. The subdomain part is permanent once set.
Here’s how to update your store name in the 2025 Shopify admin:
- From your Shopify admin, click Settings in the bottom-left corner of the sidebar
- Select General
- Find the Store details section at the top of the page
- Update the Store name field
- Click Save
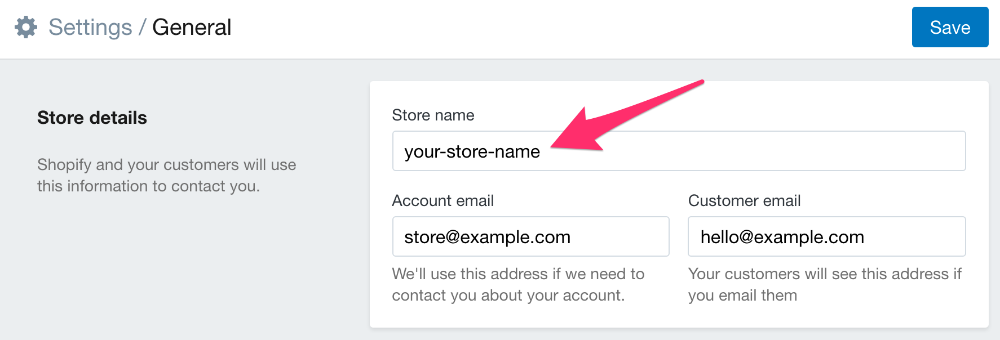
Your .myshopify.com URL is locked to whatever you entered when you created the account. If you chose something like “testtesttest123.myshopify.com” in a rush, you can’t change it. You can, however, point a custom domain at your store instead, which is what most customers will actually see.
(Struggling to find the right name for your shop? Check out our list of automatic store name generators here.)
Do I need a custom domain name for Shopify?
Yes, we’d strongly recommend it. Having a custom domain (like www.bigpicturecandles.com) does a few important things:
- It makes your store look professional and trustworthy
- It removes “myshopify.com” from your URL, which some customers find confusing
- It helps with branding across email, business cards, and social profiles
- It can improve your SEO over time (a branded domain builds authority faster than a subdomain)
The cost is low, typically $13–$20 per year depending on the registrar and whether you add domain privacy. You can buy a domain through Shopify directly (they mark it up slightly), or through Namecheap, Cloudflare Registrar, or Squarespace Domains for better value.
How to connect a custom domain to Shopify
Once you have a domain, here’s how to connect it:
- In your Shopify admin, go to Settings → Domains
- Click Connect existing domain
- Enter your domain name (e.g. yourbrandname.com) and click Next
- Shopify will show you the DNS records you need to add: typically an A record and a CNAME record
- Log in to your domain registrar (Namecheap, Cloudflare, etc.) and add those records
- Return to Shopify and click Verify connection
DNS changes can take anywhere from a few minutes to 48 hours to fully propagate. Once connected, Shopify automatically provisions an SSL certificate (the padlock in the browser). No separate setup required.
Important: Your .myshopify.com URL remains active even after you connect a custom domain. Shopify keeps it live as the “backend” address that apps and integrations use to identify your store.
Connecting Shopify to Your Inventory Management System
Here’s where things get genuinely useful. Finding your Shopify URL is step one, but what matters more for your business is making sure your inventory stays accurate as orders come in.
Most Shopify sellers start out updating stock levels manually, either in a spreadsheet, in Shopify’s built-in inventory screen, or both. That works fine at low volume. But once you’re making 20+ products and getting consistent orders, it becomes a real problem. You end up with inventory counts that are always slightly wrong, materials you’re ordering too much (or not enough) of, and no reliable way to calculate your actual product costs.
The solution is connecting Shopify to an inventory management system that does the tracking automatically.
What Shopify’s built-in inventory tracking doesn’t cover
Shopify does track finished product inventory. If you sell 3 candles, it’ll subtract 3 from your stock count. But it doesn’t track:
- Raw material usage: it won’t tell you how much soy wax, fragrance oil, or wicks you used to make those candles
- Cost of goods sold (COGS): calculating your true cost per unit requires tracking materials at the ingredient level
- Manufacturing: batch production, work-in-progress, labour costs
- Multi-channel stock: if you also sell on Etsy or at markets, Shopify inventory only covers its own channel
For finished goods only, Shopify’s inventory works fine. For makers who manufacture what they sell, you need something more.
(If you were using Shopify Stocky for inventory management, note that it was discontinued in 2023, so you’ll need a third-party solution.)
How to Connect Shopify to Craftybase
Craftybase’s Shopify integration is inventory and manufacturing software built specifically for makers. It syncs with your Shopify store nightly to pull in all your orders, then automatically deducts the raw materials needed to fulfil each one.
Here’s how the connection works:
Step 1 — Find your Shopify storefront address
You’ll need your .myshopify.com URL to connect. If you’re not sure what it is, log in to your Shopify admin and look at the URL in your browser. It’ll be in the format your-store-name.myshopify.com.
Step 2 — Connect in Craftybase
- Log in to your Craftybase account (or start a 14-day free trial)
- Go to Shops (the integration hub)
- Click Add a shop and select Shopify
- Enter your .myshopify.com URL when prompted
- You’ll be redirected to Shopify to authorise the connection, then click Install app
Step 3 — Wait for the first sync
Craftybase will import your recent Shopify orders automatically. The first sync pulls in orders from the past 60 days. After that, it runs every night to keep things current.
Step 4 — Set up your recipes
For Craftybase to deduct raw materials automatically, you need to set up recipes for each product. These are essentially a bill of materials that tells the system what ingredients go into each item. Once recipes are in place, every time an order syncs from Shopify, Craftybase works backwards to deduct the right materials from your stock.
This is where the real payoff happens. You’ll always know exactly how much of each material you have on hand, when you need to reorder, and what your COGS looks like for any reporting period.
“When I saw I get a real-time overview of my stock for both products and materials” — that was the aha moment for many Craftybase users who connect from Shopify.
For a full walkthrough of syncing your Etsy and Shopify inventory with Craftybase (including tips for sellers on both platforms), check out our guide.
Keeping Your Shopify Inventory Accurate
Once you’re connected, a few habits will keep your inventory reliable:
Run manufacturing entries in Craftybase before you list new stock on Shopify. If you make a batch of 50 soy candles, log that manufacture in Craftybase first. It’ll deduct your raw materials and add the finished goods to your stock. Then when Shopify pulls the orders, everything reconciles correctly.
Check your low stock alerts. Craftybase can flag when materials drop below a threshold you set. More useful than checking Shopify’s basic inventory screen, because it’s watching your ingredients, not just finished products.
Use the COGS reports at tax time. Shopify doesn’t produce a cost-of-goods-sold report. Craftybase does, and it’s a main reason makers switch from spreadsheets. Come tax season, your COGS, beginning and ending inventory values, and Schedule C numbers are already calculated.
Frequently Asked Questions
Where is my Shopify store URL?
Your Shopify store URL is in the format your-store-name.myshopify.com. The fastest way to find it is to log in to your Shopify admin and look at the browser address bar. It'll appear as your-store-name.myshopify.com/admin. You can also find it under Settings → General → Store details in your Shopify dashboard. This URL is permanent and stays the same even if you add a custom domain later.
How do I find my Shopify store link?
To find your Shopify store link, log in to your Shopify admin and check the address bar in your browser. Your store link will be your-store-name.myshopify.com (without the /admin part at the end). You can also navigate to Settings → General in the Shopify admin to see your store details, including the myshopify.com address. If you've set up a custom domain, your public-facing store link is that custom domain instead.
What is my Shopify store URL?
Your Shopify store URL is the address you chose when you created your account, in the format your-store-name.myshopify.com. You can find it in your browser's address bar when you're logged in to your Shopify admin. It'll appear as your-store-name.myshopify.com/admin. This URL is permanent and can't be changed, even if you set up a custom domain.
How do I connect Shopify to inventory management software?
To connect Shopify to an inventory system like Craftybase, you'll need your .myshopify.com URL and authorise the integration via Shopify's app permissions. In Craftybase, go to Shops → Add a shop → Shopify, enter your store URL, and click through the Shopify authorisation screen. The system will then sync your orders automatically on a nightly schedule.
Does Craftybase sync automatically with Shopify?
Yes. Once connected, Craftybase syncs with Shopify every night to pull in new orders. Each synced order triggers automatic raw material deductions based on the recipes you've set up for your products. No manual entry needed. The first sync imports the past 60 days of orders to give you a starting baseline.
Can I change my Shopify storefront address?
You can change your Shopify store's display name under Settings → General → Store details. But the .myshopify.com subdomain is set permanently when you create your account and it can't be changed. If you want customers to see a different URL, the practical solution is to buy a custom domain (e.g. yourbrandname.com) and connect it to your Shopify store under Settings → Domains.
Why doesn't Shopify track my raw materials automatically?
Shopify is built for retailers. It tracks finished products in and out, but doesn't have a concept of raw materials, recipes, or bills of materials. For makers who manufacture what they sell, that's a significant gap. You know a sale happened, but Shopify can't tell you how much soy wax, fragrance oil, or packaging that sale consumed. Craftybase fills this gap by connecting your Shopify orders to your material stock levels through product recipes.
Ready to Stop Managing Inventory Manually?
Once you know your Shopify storefront address, the next step is getting your inventory set up properly so you’re not always playing catch-up.
Craftybase connects directly to Shopify, syncing your orders nightly and keeping your material stock accurate automatically. It also handles your COGS calculations, manufacturing records, and tax reports, so you’ve got everything in one place when you need it.
Start your free 14-day trial → No credit card required.
